Combat Strategy in Slay the Spire 2
There are two decision scopes in strategy games: the immediate, small-scale "micro" choices and the larger, long-term "macro" considerations. Both play a critical role in your eventual success.
In an RTS, "micro" would be your direct unit management and movement, or how you approach a fight, while "macro" would refer to how you grow and handle your economy, what build order you choose, and what kind of endgame strategy you try to execute.
"Micro" in Slay the Spire refers to combat decisions: when or where to play cards and potions in each encounter. This is in contrast to "macro," which concerns deck-drafting and map-traveling.
Keep these micro principles in mind to snowball your run or overcome a close call:
Blocking in Slay the Spire 2 is not optional
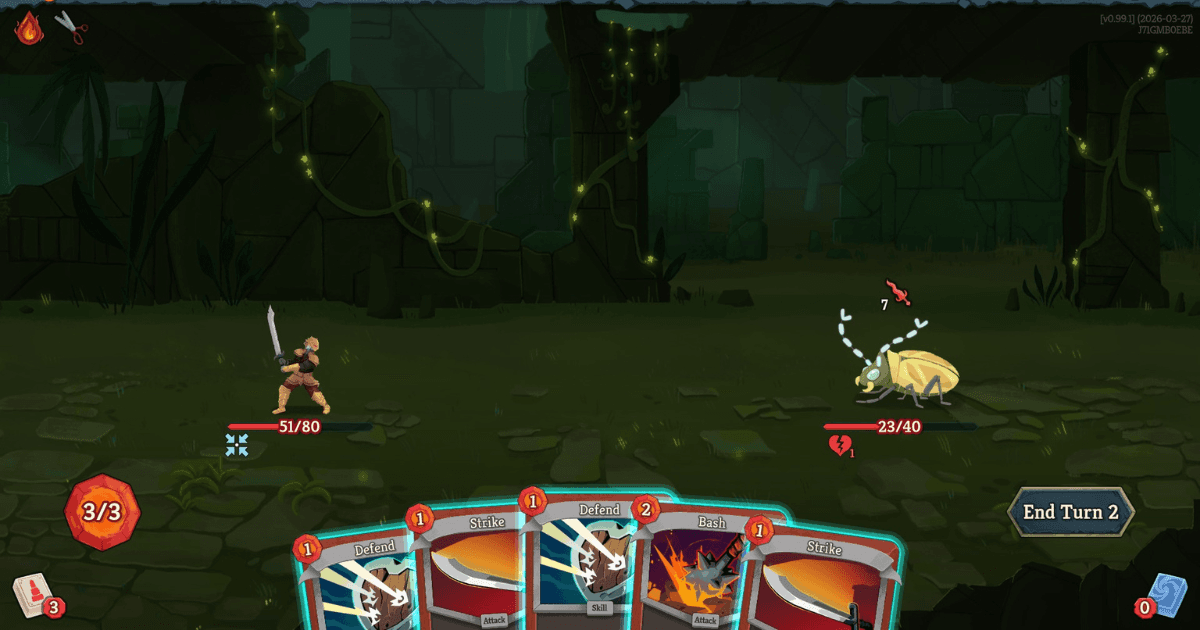
Choosing to block is declaring that you have a plan of how a fight will close out: Either you're stalling for more efficient damage, like after your Strength and Vulnerable come down, or you know of a future opportunity to hit safely, like on the enemies' off-turn or after you stabilize. If a fight is finished by an upcoming damage draw, then preserve HP until then. Be sure to regularly monitor your draw pile to stay aware of the bigger picture.
If blocking would bleed you out, you'll need to trade blows to make progress. And even when your upcoming block cards are capable, consider taking chip damage to hedge for a next-turn lethal line in case you don't see them. It's common in multi-enemy fights to push for an early kill and then be stingy with your resources once the total threat is lessened. Weigh the immediate savings against the impact of extending the encounter. If you don't advance the fight, you're just treading water.
Learn the Specific Encounter Mechanics
In Slay the Spire 2, you can more reliably predict enemy actions on future turns and how speedily they scale than you could in the original game. Precisely reading the enemy intent indicators will also go a long way. If checking Untapped.gg every encounter sounds like a slog, you can research just one every run, starting with a boss or an early elite. Remember that the 'end turn' button now tracks the turn count.

What's Your Win Condition?
The hefty scaling solution you drafted may not be worth playing in quick encounters that demand front-loaded damage. Some of your arsenal should cater to answering specific types of fights. Novices often fixate on squeezing out irrelevant damage that is eclipsed in long, late-game fights by a decisive win condition. If you reach safety by stabilizing or culling down to a deadly loop/infinite, then a single exhaust, draw, or health point may be more impactful than even a 60-damage swing. Infinite + 60 is still just infinite.
Reshuffle Your Deck With Purpose
Your turn's initial draws happen after your previous turn's hand gets discarded, so those previous cards are all included in the reshuffle of a depleted draw pile. Conversely, drawing to reshuffle your deck mid-turn removes cards in your hand from the next cycle.
This is an impactful way to include your most important cards and cull what's less relevant to the fight. Avoid drawing altogether if a premature reshuffle would unavoidably leave out high-value cards. It's common to optimize for high block density in the reshuffle when your scaling is ramping up, which is often the case after your first cycle concludes.
Calculate First, Then Execute – Planning Out Your Turns in StS2
Compare competing plays algebraically for differences in damage dealt and resources saved. Don't indiscriminately play out a line, only to desperately reach for your potions after the result doesn't quite cut it. Order matters often because of the modifiers applied.
Avoid unnecessarily committing cards and potions until you know your full turn. Leave room to reassess your plan between every new discovery (card draws, random targeting, and random card generation). If you decide to dedicate Energy before drawing, consider the value you're making against the risks of missing key cards. Sometimes, the extra 4 damage from Vulnerable added to your Pommel Strike isn't worth blindly sending your Bash beforehand. With a five-card draw pile, you can often plan out the following turn as well.
Damage you deal in excess of enemy HP is wasted. If the kill is limited to waiting on the chunky attack in your draw pile, save just enough room in their HP bar – consider spending your strike on another target, or block. While it's usually ideal to open with random targeting as lightning evokes, it's sometimes better to finish off a feeble foe first to prevent a bad break point. Always account for future turns where the enemy may block or weaken your attacks.
"Wasteful" plays can still be correct! Sometimes, you should push inefficient strikes if it means not having to rely on drawing the sole chunky attack to kill next turn. Putting all your eggs in one basket can open up disastrous low-rolls.
Similarly, spending Energy on a single Defend instead of Bash to avoid a 1HP loss can feel bad, but it's free when you know you can confidently close out the fight flawlessly.
Lines with a better average result can have higher variance. The more confident you are in your run, the more mindful you should be of nasty outliers. "Hope for the best, but expect the worst".
What are Setup Relics in Slay the Spire 2?
Setup Relics are defined by counters that persist between fights. Stick around for an extra turn to prime them for early output in your next battle, which is when you're most exposed. Keep your  Happy Flower happy and set it up for that +1 Energy at the start of your next fight.
Don't overcommit to doing this: make sure you have an out if you brick your draw. It's sometimes wise to save extra room in the enemy HP bar to allow for draw manipulation like Headbutt or Pommel Strike, a source of Block like Flame Barrier or  Parrying Shield and automatic Relics like
  Bronze Scales or Hourglass to avoid a premature kill. It may even be worth taking a bit of chip damage for setup if your next fight is a boss.
Don't Be a Serial Potion Hoarder
Be realistic about what your potions are worth in Slay the Spire 2, and be mindful of opportunities to convert them into HP savings. You should look to spend them whenever you risk overflow, and only save them up when there's a significant upcoming threat.
Potion drop odds in Slay the Spire 2
- Your potion drop chance hard-resets to 40% at the beginning of every new Act and automatically adjusts by 10% based on your combat rewards:
- Decreases by 10% for your next fight if a potion drops.
- Increases by 10% for your next fight if a potion does not drop.
- Elite combats add an independent 12.5% bonus drop chance to your current odds.
- If your standard drop roll fails but this Elite bonus roll succeeds, you still receive a potion, but your underlying base chance will still climb by 10% for the next room.
- The White Beast Statue bypasses all underlying math, guaranteeing a potion drop after every combat.
You can always check our card database mid-game to get a feel for card pools when assessing random generation, like Attack or Skill potions. All cards in their respective pools are equally likely regardless of rarity, barring a few outright omissions.

Absey32 is a writer and streamer passionate about roguelites, arena shooters, consumer tech, and discovering music.
Hungry for more Slay the Spire 2 knowledge? Be sure to check out our Getting Started guide!